The Power of the ThreatQ Open Exchange API - Part 1
POSTED BY JULIAN DEFRONZOWhile most user interaction with the ThreatQ threat intelligence platform is done from the user interface, you can discover just how extensible and powerful the platform is by working directly with the ThreatQ Open Exchange API. It is through the API that feeds, custom connectors, and other integrations interact with the platform, allowing you to script out threat creation and retrieval of data from the Threat Library to support your specific workflows.
In this blog series, we will cover many use cases for working with the ThreatQ Open Exchange API. Here, in Part 1, we will cover Authentication and working with Indicators.
Authentication
Step One: Create an Authentication JSON file
The ThreatQ Open Exchange uses the OAuth protocol for authentication. This process involves getting a username, password, and Client ID. To get started, create a JSON file with the following structure, replacing the email, password, and client_id with your specific credentials. We will use this file to facilitate authentication to the API (Figure 1).
| $ cat auth.json { “email”: “user@threatq.com”, “password”: “thisisapassword”, “grant_type”: “password”, “client_id”: “yjc0mmi1ymezn2fjmzvmy2i2otaxm2zm” } |
Figure 1: Authentication JSON file
Use your email address and password to login to the ThreatQ user interface.To obtain your Client ID, access the ThreatQ user interface and navigate to Settings » OAuth Management and copy the displayed client ID (Figure 2).
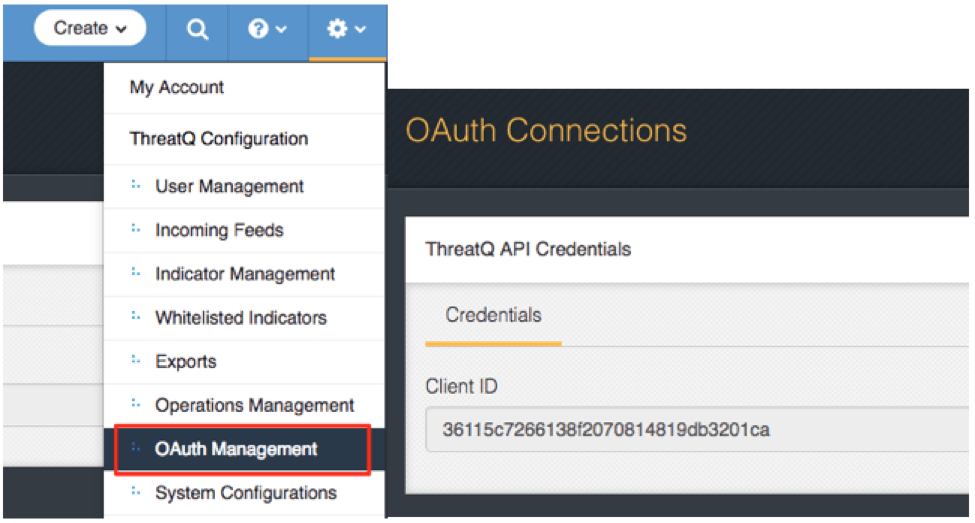 Figure 2: Obtaining your Client ID
Step Two: Request an Access Token
Before we can make any requests to the API, to make the next few examples easier to follow along, you can store the hostname or IP address of your ThreatQ system as a shell variable, THREATQ_HOST (Figure 3).
| $ export THREATQ_HOST=”tq.threatq.com” $ echo $THREATQ_HOST tq.threatq.com |
Figure 3: Setting THREATQ_HOST variable
To access the API endpoints, you will first need to request an API access token (Figure 4). You will use this token in the header of subsequent requests.
|
$ curl -k -X POST “https://$THREATQ_HOST/api/token” -H “Content-Type: application/json” -d @auth.json { |
Figure 4: Obtaining Access Token
The most important value to note in this response for now is the access_token. This will be used for subsequent requests to the API. You can store the access_token as another shell variable ACCESS_TOKEN (Figure 5).
| $ export ACCESS_TOKEN=NTFlMWYwZGNmOTc5 $ echo $ACCESS_TOKEN NTFlMWYwZGNmOTc5 |
Figure 5: Setting ACCESS_TOKEN variable
NOTE: This token will expire in 60 minutes (3600 seconds) and will need to be refreshed using the previous step to obtain a new access token.
Working with Indicators
The following examples are based around simple use cases for working with indicators in the API.
Listing Indicators
To retrieve a list of indicators, use the /api/indicators endpoint. This will return the basic data for each indicator in an array. In this case, we are limiting the results to five indicators (Figure 6).
|
$ curl -k “https://$THREATQ_HOST/api/indicators?limit=5” -H “Authorization: Bearer $ACCESS_TOKEN” { |
Figure 6: Retrieving a list of Indicators
Querying for Specific Indicator Values
In this example we want to query for the FQDN, example.com in our Threat Library. We can use the /api/indicators endpoint again, passing a value URL parameter with our search query (Figure 7). The API will return the basic indicator fields.
|
$ curl -k “https://$THREATQ_HOST/api/indicators?value=example.com” -H “Authorization: Bearer $ACCESS_TOKEN” { |
Figure 7: Querying for example.com
To return more fields beyond the basic ones, we can include a with URL parameter to specify the additional data fields we want to include. Options for this endpoint include adversaries, attachments, attributes, comments, events, indicators, score, signatures, sources, status, tags, type, and watchlist. In this case we are requesting sources, score, and attributes (Figure 8).
|
$ curl -k “https://$THREATQ_HOST/api/indicators?value=example.com&with=sources,score,attributes” -H “Authorization: Bearer $ACCESS_TOKEN” { |
Figure 8: Specifying additional data fields
Creating an Indicator
To create an indicator, we will first create a JSON file that will contain the basic indicator details: the indicator value, the type of indicator, the indicator’s status and the source of the indicator. As in the authentication step above, we will create a JSON file to facilitate making the API call (Figure 9).
|
$ cat indicator.json { |
Figure 9: Indicator JSON file
With the JSON file created, we can create the indicator by making a POST to /api/indicators (Figure 10).
|
$ curl -k -X POST “https://$THREATQ_HOST/api/indicators” -H “Authorization: Bearer $ACCESS_TOKEN” -d@indicator.json { |
Figure 10: Creating an Indicator
The ThreatQ Open Exchange API is a powerful backend tool that provides flexibility in working with the data in the Threat Library. By using the API directly, you can manipulate and create new data in a way that works best with your workflows. In Part 2 of this blog series, we will cover more API use cases, including working with Events, Adversaries, and Files.

0 Comments